
How to Share Your 3G/4G Data Card Over Wifi with Ubuntu Linux
Make your own hotspot
Do you have a 3G/4G data card for accessing the internet but you have more than one computer with which you want to share that access? No problem with Ubuntu Linux and the right WIFI card. You'll need to install some packages, do a little configuring and run a script and you should be up and running in no time.
In short the steps are:
- Verify: WIFI card can support "master mode" or act as an Access Point.
- Install: You will need hostapd, dhcp3-server, firestarter.
- Config: Do some configuration edits on those packages.
- Script: Run a script that starts everything.
- Firewall: Start firestarter to connect the Wifi Access Point to the 3G data card.
- Trouble Shooting: Extra info if you are stuck
- Starting/Stopping: How to start and stop once it works
Verify Your WIFI Card Will Work
Gather information about your card if you don't know what it is or if it will work. Hit Control-Alt-T to start a shell and then enter the following commands to see what is on your system:
lspci | grep -i wireless
In my machine this produces about all I need to know. The manufacturer and the card AR9285. From there I can find out more info, but I know that Atheros drivers will work.
$ lspci | grep -i wireless
02:00.0 Network controller: Atheros Communications Inc. AR9285 Wireless Network Adapter (PCI-Express) (rev 01)
Want more info? Take that first number that you get from your machine (in this example 02:00.0) and use it as follows in your shell:
lspci -vv -s 02:00.0
Again on my machine I get the following
$ lspci -vv -s 02:00.0
02:00.0 Network controller: Atheros Communications Inc. AR9285 Wireless Network Adapter (PCI-Express) (rev 01)
	Subsystem: Device 1a3b:1089
	Control: I/O+ Mem+ BusMaster+ SpecCycle- MemWINV- VGASnoop- ParErr- Stepping- SERR- FastB2B- DisINTx-
	Status: Cap+ 66MHz- UDF- FastB2B- ParErr- DEVSEL=fast >TAbort- <TAbort- <MAbort- >SERR- <PERR- INTx-
	Latency: 0, Cache Line Size: 32 bytes
	Interrupt: pin A routed to IRQ 17
	Region 0: Memory at fbff0000 (64-bit, non-prefetchable) [size=64K]
	Capabilities: <access denied>
	Kernel driver in use: ath9k
	Kernel modules: ath9k
Let's see what the kernel says about the card. Notice the name of the kernel module. In my case ath9k. Now do the following:
modinfo ath9k
This produces more than you need to know:
$ modinfo ath9k
filename:       /lib/modules/2.6.35-25-generic/kernel/drivers/net/wireless/ath/ath9k/ath9k.ko
license:        Dual BSD/GPL
description:    Support for Atheros 802.11n wireless LAN cards.
author:         Atheros Communications
srcversion:     30BA823139AB475E4E4C260
alias:          pci:v0000168Cd0000002Esv*sd*bc*sc*i*
alias:          pci:v0000168Cd0000002Dsv*sd*bc*sc*i*
alias:          pci:v0000168Cd0000002Csv*sd*bc*sc*i*
alias:          pci:v0000168Cd0000002Bsv*sd*bc*sc*i*
alias:          pci:v0000168Cd0000002Asv*sd*bc*sc*i*
alias:          pci:v0000168Cd00000029sv*sd*bc*sc*i*
alias:          pci:v0000168Cd00000027sv*sd*bc*sc*i*
alias:          pci:v0000168Cd00000024sv*sd*bc*sc*i*
alias:          pci:v0000168Cd00000023sv*sd*bc*sc*i*
depends:        ath9k_hw,mac80211,led-class,ath,cfg80211,ath9k_common
vermagic:       2.6.35-25-generic SMP mod_unload modversions 686
parm:           debug:Debugging mask (uint)
parm:           nohwcrypt:Disable hardware encryption (int)
That should give you plenty of information to start checking on the internet. Here's a short list of cards that not only will work, but will also support encryption.
Known Working Cards
- Linux drivers that support nl80211/cfg80211 (most new drivers)
- Linux drivers that support Linux Wireless Extensions v19 or newer with WPA/WPA2 extensions
- Host AP driver for Prism2/2.5/3 (WPA and WPA2)
- Linuxant DriverLoader with Windows NDIS driver supporting WPA/WPA2
- Agere Systems Inc. Linux Driver (Hermes-I/Hermes-II chipset) (WPA, but not WPA2)
- madwifi (Atheros ar521x)
- ATMEL AT76C5XXx
- Linux ndiswrapper
- Broadcom wl.o driver
- Intel ipw2100
- Intel ipw2200
- Wired Ethernet drivers
- BSD net80211 layer (e.g., Atheros driver) (FreeBSD 6-CURRENT and NetBSD current)
- Windows NDIS drivers (Windows; at least XP and 2000, others not tested)
Install Your Packages.
There are a a few packages that need to be installed. On Ubuntu in a shell (control-alt-t) type the following:
sudo apt-get install firestarter dhcp3-server hostapd
Firestarter is a simple firewall that will allow you to bridge your internet traffic (via NAT) between your 3G connection and your WIFI card. The dhcp3-server is a tool that will provide IP addresses for your clients who connect to your WIFI Hotspot (access point). And finally the hostapd is a powerful tool that creates all the control and data layers required for running the hotspot access point including encryption.
Configure Your Packages.
Let's start with the dhcp3-server. The config file is located in /etc/dhcp3/dhcpd.conf.
sudo gedit /etc/dhcp3/dhcpd.conf
Just add the following to the bottom of the file:
subnet 192.168.3.0 netmask 255.255.255.0 {
range 192.168.3.10 192.168.3.49;
option routers 10.2.144.164;
option ip-forwarding off;
option subnet-mask 255.255.255.0;
option broadcast-address 192.168.3.255;
}
This tells the server that the device on 192.168.3.0 will be provided IP address as required starting with 198.168.3.10 and going to 192.168.3.49. It also tells it where the router is (10.2.144.164) which is your 3G data card. Since this number is dynamic every time you connect, we will use a script to manipulate this setting which we discuss later.
Save that file and close the editor. Now return to the shell and let's create a config file for hostapd. Now we need to know something about how your system is setup. Connect your 3G modem so that you can access the internet. Now do the following command to gather some information:
ifconfig
Example output:
eth0      Link encap:Ethernet  HWaddr e0:cb:4e:1c:48:db
          UP BROADCAST MULTICAST  MTU:1500  Metric:1
          RX packets:0 errors:0 dropped:0 overruns:0 frame:0
          TX packets:0 errors:0 dropped:0 overruns:0 carrier:0
          collisions:0 txqueuelen:1000
          RX bytes:0 (0.0 B)  TX bytes:0 (0.0 B)
          Interrupt:45

lo        Link encap:Local Loopback
          inet addr:127.0.0.1  Mask:255.0.0.0
          inet6 addr: ::1/128 Scope:Host
          UP LOOPBACK RUNNING  MTU:16436  Metric:1
          RX packets:675 errors:0 dropped:0 overruns:0 frame:0
          TX packets:675 errors:0 dropped:0 overruns:0 carrier:0
          collisions:0 txqueuelen:0
          RX bytes:202993 (202.9 KB)  TX bytes:202993 (202.9 KB)

ppp0      Link encap:Point-to-Point Protocol
          inet addr:10.3.16.169  P-t-P:10.64.64.64  Mask:255.255.255.255
          UP POINTOPOINT RUNNING NOARP MULTICAST  MTU:1500  Metric:1
          RX packets:6334 errors:10 dropped:0 overruns:0 frame:0
          TX packets:6545 errors:0 dropped:0 overruns:0 carrier:0
          collisions:0 txqueuelen:3
          RX bytes:5714528 (5.7 MB)  TX bytes:1179799 (1.1 MB)

wlan0     Link encap:Ethernet  HWaddr 00:25:d3:e4:a5:0a
          inet6 addr: fe80::225:d3ff:fee4:a50a/64 Scope:Link
          UP BROADCAST MULTICAST  MTU:1500  Metric:1
          RX packets:19 errors:0 dropped:0 overruns:0 frame:0
          TX packets:54 errors:0 dropped:0 overruns:0 carrier:0
          collisions:0 txqueuelen:1000
          RX bytes:8560 (8.5 KB)  TX bytes:11514 (11.5 KB)
What you can see from here is ppp0 is your 3G modem at 10.3.16.169 (yours will vary) and your wifi card is at wlan0. All you need is to take note of the names "ppp0" and "wlan0" as these are sometimes different on other systems.
Ok let's make the hostapd config file for an open WIFI system:
cd
mkdir hostapd
cd hostapd
gedit hostapd_open.conf
Put the following contents into the file using the name you found from above for your wifi card (in this case wlan0):
interface=wlan0
driver=nl80211
ssid=PUT_YOUR_HOTSPOT_NAME_HERE
channel=2
hw_mode=g
Obviously you'll want the ssid to be whatever name you want broadcast for your connection. You can also select different channels to make sure you aren't stepping on a neighbor.
Finally if you want encryption (once you have the open network working) I suggest you take a look at the example configuration files given by hostapd.
Script to Run it Automatically
Now lets create a script to pull it all together in your ~/hostapd directory.
gedit ~/hostapd/share.sh
Place the following into your editor and change the ppp0 or wlan0 if these are different on your system.
#!/bin/sh
#
# Where is your internet connection from?  Most 3G modems are on ppp0
INET_IFACE="ppp0"
#
# You must have an active connection over your 3G network before running this script
# When you run it, it reads IP address for this connection
INET_IP=$(ifconfig $INET_IFACE |sed -n "/inet addr:.*255.255.255.255/{s/.*inet addr://; s/ .*//; p}")
#
# Using this new assigned IP from your 3G network
# We have to update dhcp.conf router with current INET_IFACE IP address
# !!Warning this sed command will change any "option routers xxx.xxx.xxx.xxx" to the INET_IP in your config file
# Modify the sed command if you need to avoid this because you have some other dhcp setup running
sed -i "s/option\ routers\ [0-9]*.[0-9]*.[0-9]*.[0-9]*;/option\ routers\ $INET_IP;/" /etc/dhcp3/dhcpd.conf
#
# Where is your wifi card?
LAN_IFACE="wlan0"
#
# We need to assign an IP address to your wifi card for the dhcp service
# Force an IP address (if you change this you need to change your dhcpd.conf file too)
Wlan_IP="192.168.3.0"
#
# Configure the wireless interface
ifconfig $LAN_IFACE down
ifconfig $LAN_IFACE $Wlan_IP netmask 255.255.255.0
ifconfig $LAN_IFACE up
#
# Start the wireless AP service layers and turn on the AP in the background with lots of debug messages (-dd)
# you can also change the -dd to -d or remove it for less messages
hostapd -dd ~/hostapd/hostapd_open.conf &
#
# Restart the dhcp server now that the AP is up and running
/etc/init.d/dhcp3-server restart
Save and exit the editor. Now change the mode of this file so it can be executed
chmod 770 share.sh
At this point you should be ready to test the system. Make sure your 3G data card is plugged in and connected to the internet. Once you've done that make sure the switch on your wifi card is on and run your script with sudo.
sudo ~/hostapd/share.sh
The output will look something like this:
 * Stopping DHCP server dhcpd3                                           [fail]
Configuration file: /home/eb/hostapd/hostapd_open.conf
Opening raw packet socket for ifindex -1077961020
BSS count 1, BSSID mask ff:ff:ff:ff:ff:ff (0 bits)
SIOCGIWRANGE: WE(compiled)=22 WE(source)=21 enc_capa=0xf
nl80211: Added 802.11b mode based on 802.11g information
Allowed channel: mode=1 chan=1 freq=2412 MHz max_tx_power=20 dBm
Allowed channel: mode=1 chan=2 freq=2417 MHz max_tx_power=20 dBm
Allowed channel: mode=1 chan=3 freq=2422 MHz max_tx_power=20 dBm
Allowed channel: mode=1 chan=4 freq=2427 MHz max_tx_power=20 dBm
Allowed channel: mode=1 chan=5 freq=2432 MHz max_tx_power=20 dBm
Allowed channel: mode=1 chan=6 freq=2437 MHz max_tx_power=20 dBm
Allowed channel: mode=1 chan=7 freq=2442 MHz max_tx_power=20 dBm
Allowed channel: mode=1 chan=8 freq=2447 MHz max_tx_power=20 dBm
Allowed channel: mode=1 chan=9 freq=2452 MHz max_tx_power=20 dBm
Allowed channel: mode=1 chan=10 freq=2457 MHz max_tx_power=20 dBm
Allowed channel: mode=1 chan=11 freq=2462 MHz max_tx_power=20 dBm
Allowed channel: mode=0 chan=1 freq=2412 MHz max_tx_power=20 dBm
Allowed channel: mode=0 chan=2 freq=2417 MHz max_tx_power=20 dBm
Allowed channel: mode=0 chan=3 freq=2422 MHz max_tx_power=20 dBm
Allowed channel: mode=0 chan=4 freq=2427 MHz max_tx_power=20 dBm
Allowed channel: mode=0 chan=5 freq=2432 MHz max_tx_power=20 dBm
Allowed channel: mode=0 chan=6 freq=2437 MHz max_tx_power=20 dBm
Allowed channel: mode=0 chan=7 freq=2442 MHz max_tx_power=20 dBm
Allowed channel: mode=0 chan=8 freq=2447 MHz max_tx_power=20 dBm
Allowed channel: mode=0 chan=9 freq=2452 MHz max_tx_power=20 dBm
Allowed channel: mode=0 chan=10 freq=2457 MHz max_tx_power=20 dBm
Allowed channel: mode=0 chan=11 freq=2462 MHz max_tx_power=20 dBm
RATE[0] rate=10 flags=0x2
RATE[1] rate=20 flags=0x6
RATE[2] rate=55 flags=0x6
RATE[3] rate=110 flags=0x6
RATE[4] rate=60 flags=0x0
RATE[5] rate=90 flags=0x0
RATE[6] rate=120 flags=0x0
RATE[7] rate=180 flags=0x0
RATE[8] rate=240 flags=0x0
RATE[9] rate=360 flags=0x0
RATE[10] rate=480 flags=0x0
RATE[11] rate=540 flags=0x0
Passive scanning not supported
Mode: IEEE 802.11g  Channel: 2  Frequency: 2417 MHz
Flushing old station entries
Deauthenticate all stations
Using interface wlan0 with hwaddr 00:25:d3:e4:a5:0a and ssid 'TEST_STATION'
wlan0: Setup of interface done.
MGMT (TX callback) ACK
Malformed netlink message: len=432 left=256 plen=416
256 extra bytes in the end of netlink message
 * Starting DHCP server dhcpd3                                           [ OK ]
So far so good. Both DHCP and Hostapd come up and run. If you're tempted to see your hotspot you can go to another device and search for it. You should see it broadcasting and you should be able to connect to it. Alas, no web pages come up. Why? We still need to bridge the data from ppp0 (your 3G card) to your wireless card (wlan0). We have to run firestarter for this.
Setting up the Firewall
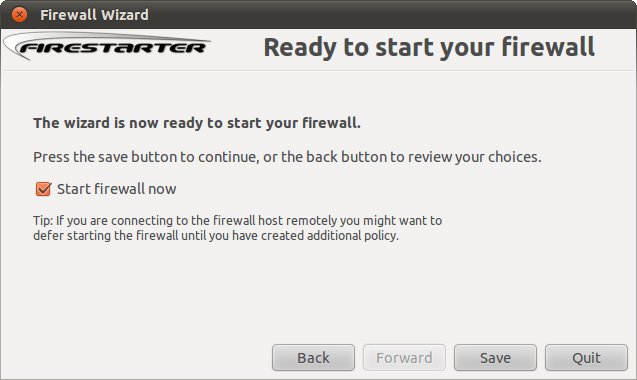
On your desktop go to Applications->Internet->Firestarter. This will start up the wizard automatically. Configure each screen as follows:

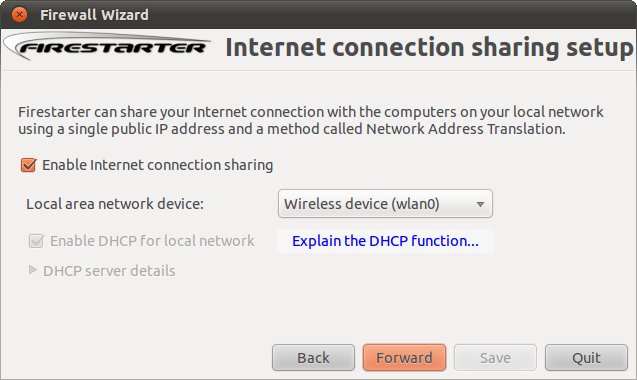
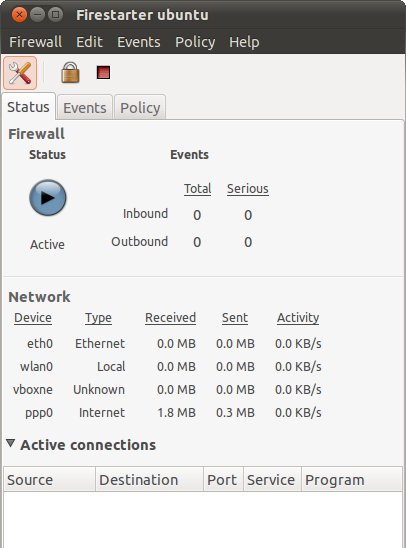
Next you will see your system and if you expand your connections you'll see the clients and their data rates.
Trouble Shooting
Hostapd help documentation.
DHCP help (no IP assiged, etc) this Ubuntu Guide.
Setup for this demonstration was Ubuntu 10.10: Linux ubuntu 2.6.35-25-generic #44-Ubuntu SMP Fri Jan 21 17:40:48 UTC 2011 i686 GNU/Linux
How to start and stop
Starting
Once you have everything configured, and you're starting from a fresh reboot. All you have to do is plug in your 3G data card and connect to the internet. After the connection is established, hit Control-Alt-T for the shell and type the following:
sudo ~/hostapd/share.sh
This will launch your script and start up your wifi hotspot. The next step is to start firestarter. Go to Applications->Internet->Firestarter and start your firewall. This will allow traffic to flow from the data card to the wifi card. Once everything is running you can close the firestarter monitor and the shell if you want. Everything should continue running.
Stopping
You can always just shut off the computer.
However if you want to just shut off some of the services, we have to kill the hostapd process to shut down your wifi AP. Hit Control-Alt-T to bring up the shell and type the following command:
ps aux | grep hostapd
Then examine the output and look for the four digit process number. See the following example:
$ ps aux | grep hostapd
root     10281  0.1  0.1   4604  1356 ?        S    08:34   0:00 hostapd -dd /home/user/hostapd/hostapd_open.conf
user       10358  0.0  0.0   4012   768 pts/1    S+   08:34   0:00 grep --color=auto hostapd
The first item for "root" is 10281 (this number will be different everytime) you can see this is for hostapd. This is the process you want to kill. Ignore the process for grep, that is the command you just ran. Enter the following using the number you see from the previous step:
sudo kill 10281
Then you can go to your desktop and you can shut down the firestarter firewall.